

Source Code Management [Git and GitHub] Fundamental & Advanced


📍Introduction
Are you ready to embark on an exciting voyage into the world of software collaboration? 🌐 Say hello to Git and GitHub, the dynamic duo that make version control an absolute breeze! 🌀
Git, the genius behind the scenes, is your trusty time-traveling magician 🎩. It lets you save snapshots of your code at different stages, ensuring you never lose track of changes. Say goodbye to "Oops, I broke it!" moments 🙈 – Git has your back!
But wait, there's more! Meet GitHub 🐙 – your social playground for code. Imagine a place where you and your coding pals can collaborate seamlessly, review each other's work 👀, and dance with pull requests 🕺. With GitHub, your projects are no longer just files, they're living, breathing communities! 🚀
Whether you're a solo coder or part of a mega team, Git and GitHub revolutionize how software is built. 🛠️ So buckle up, fellow explorer! Together, we'll delve into branching 🌿, merging 🤝, and crafting the perfect commit messages 📝. Let's make coding history – one commit at a time! 🌟🚀
📍Distributed Version Control System (DVCS)
A distributed version control system (DVCS) is a type of version control system that allows multiple developers to work on the same project simultaneously, while each of them maintains their own complete copy of the project's codebase, history, and changes. Unlike traditional version control systems, where changes are managed on a central server, a DVCS enables developers to work independently and efficiently without requiring constant access to a central repository.
Key characteristics of a distributed version control system include:
Full Repositories: Each developer has a full copy of the entire repository, including all the history and branches. This makes the repository more resilient to server failures or network issues.
Offline Work: Developers can work offline without needing a constant connection to a central server. They can commit changes, create branches, and perform other operations locally.
Fast Operations: Most operations (such as committing changes, creating branches, and viewing history) are fast since they are performed locally.
Branching and Merging: DVCS makes branching and merging easier and less error-prone. Developers can create branches for new features or bug fixes and merge them back into the main codebase.
Collaboration: Developers can collaborate by sharing changes directly between their repositories. They can push and pull changes to and from each other, allowing for efficient code review and collaboration.
Backup and Recovery: Each developer's repository serves as a backup of the entire project, reducing the risk of data loss.
One of the most popular distributed version control systems is Git, In this blog, we will take a Deep Dive into learning about Git and its fundamentals.
📍Git [Global Information Tracker]
Git is a distributed version control system (DVCS) designed to handle everything from small to very large projects with speed and efficiency. It was created by Linus Torvalds in 2005 and has since become the de facto standard for version control in software development. Here's a breakdown of its key concepts and functions:
Version Control: Git helps developers track changes in their codebase over time. It allows you to save snapshots of your project at different points, called "commits." Each commit records the changes made to files, creating a history that can be easily navigated.
Distributed: Unlike older version control systems that relied on a central repository, Git is distributed. This means that each developer has their own complete copy of the repository, including its entire history. This decentralization allows for faster and more flexible collaboration.
Branching: Git makes branching easy. Developers can create multiple branches to work on separate features or bug fixes. This isolation prevents changes in one branch from affecting others until they're ready to be merged.
Merging: Git provides tools to combine changes from one branch into another, a process known as merging. This allows different developers to work on their features independently and then integrate their changes back into the main codebase.
Staging Area: Git introduces the concept of a staging area or "index." This allows you to selectively choose which changes to include in the next commit, providing greater control over commit contents.
📍Git Commands
🐧git init:
Description: Initializes a new Git repository in the current directory.
Example:

🐧git add <file(s)>:
Description: Stages changes in specified file(s) for the next commit.
Example:

🐧git status:
Description: Shows the status of your working directory, including staged/unstaged changes.
Example:

🐧git commit -m "Commit message":
Description: Records staged changes as a new commit with a descriptive message.
Example:

🐧git push:
Description: Uploads committed changes to a remote repository.
Example:

🐧git branch:
Description: Lists all branches in the repository.
Example:

🐧git checkout <branch_name>:
Description: Switches to the specified branch.
Example:

Starting from Git version 2.23, you can also create and switch to a new branch in a single command using the
-boption withgit checkout:
🐧git merge <branch_name>:
Description: Merges changes from the specified branch into the current branch.
Example:

🐧git remote -v:
Description: Lists remote repositories and their URLs.
Example:

🐧git log:
Description: Displays a chronological list of commits.
Example:

🐧git diff:
Description: Shows changes between the working directory and the last commit.
Example:

🐧git revert:
git revert command is used to create a new commit that undoes the changes introduced by a previous commit. This is a way to effectively "undo" a commit without removing it from the commit history entirely.
Here's how to use git revert:

Where <commit_hash> is the hash of the commit you want to revert.
Here's a breakdown of what happens when you use git revert:
Select Commit: You provide the hash of the commit you want to revert. The revert operation will undo the changes made by this commit.
Create New Commit: Git creates a new commit that applies the inverse changes of the specified commit. This commit has a message indicating that it is a "revert" of the original commit.
Commit History: The new revert commit is added to the commit history as the latest commit. It effectively undoes the changes introduced by the original commit, while keeping the history consistent.
For example, if you want to revert the changes introduced by commit
abc123, you would run:
🐧git reset <file>:
Description: Unstages a file, removing it from the staging area.
Example:

🐧git ignore:
The .gitignore file is used to specify intentionally untracked files and directories that Git should ignore. This is particularly useful for excluding files that are generated automatically (e.g., compiled binaries) or contain sensitive information (e.g., credentials) from being committed to the repository.
Here's how you use .gitignore:
Create a file named
.gitignorein the root of your Git repository.Add patterns to the file to specify files, directories, or patterns to be ignored.
Example .gitignore file:

Remember to commit the .gitignore file to your repository so that others can benefit from the same ignored patterns.
🐧Git Stash:
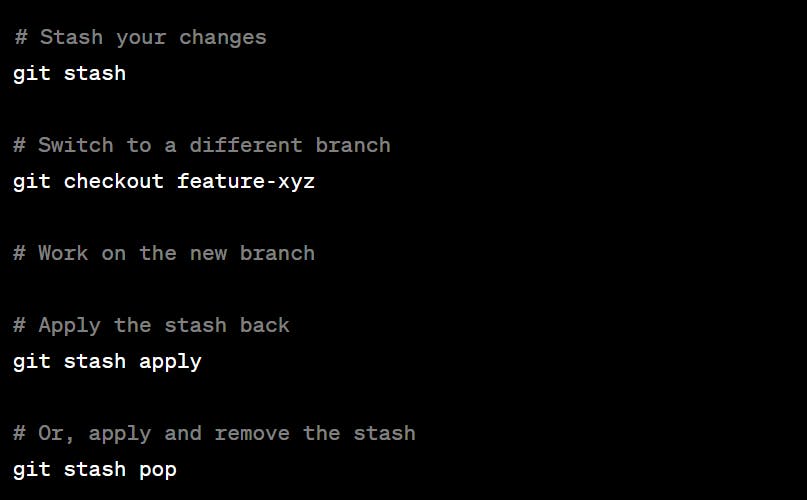
git stash is a command used to temporarily save changes that you're not yet ready to commit, allowing you to switch to a different branch or work on a different task. It's like putting your changes in a "stash" away from your working directory.
Here's how to use git stash:
git stash: Stashes your changes.git stash list: Lists all stashes.git stash apply stash@{n}: Applies the changes from a specific stash.git stash pop: Applies and removes the latest stash.git stash drop stash@{n}: Deletes a specific stash.
Example usage:
🐧Git Cherry-Pick:
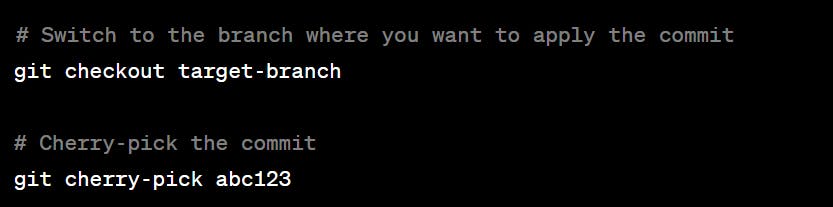
git cherry-pick is used to apply a specific commit from one branch onto another branch. It's like manually selecting and copying a commit to another branch.
Here's how you use git cherry-pick:
git cherry-pick <commit_hash>: Applies the specified commit to the current branch.
Example usage:
Keep in mind that conflicts can occur when cherry-picking if the changes from the commit you're cherry-picking interfere with changes in the target branch. You might need to resolve these conflicts manually.
🐧git reset --hard HEAD:
Description: Discards all changes and resets the working directory to the last commit.
Example:

git remote add <name> <url>:
Description: Associates a remote repository with a name and URL.
Example:

📍GitHub
GitHub is a web-based platform built around Git. It offers a range of features that enhance collaboration and make working with Git repositories more accessible. Here's an overview:
Remote Hosting: GitHub provides a place to store your Git repositories in the cloud, allowing you to access your code from anywhere and collaborate with others.
Repositories: A repository (or "repo") is a container that holds all your project files, along with their complete version history. Repositories on GitHub can be public (visible to anyone) or private (accessible only to authorized users).
Pull Requests: GitHub introduces the concept of pull requests (PRs), which facilitate code review and collaboration. With a PR, you propose changes from a branch in one repository to be merged into another branch (usually the main branch) of another repository. It's a formalized way to discuss and review code changes.
Issues and Bug Tracking: GitHub provides tools for issue tracking, allowing you to manage tasks, bugs, feature requests, and discussions related to your project.
Wikis and Documentation: Repositories on GitHub can include wikis and documentation, making it easier to maintain project-related information.
Actions and CI/CD: GitHub Actions enables you to automate workflows, including continuous integration (CI) and continuous deployment (CD), to build, test, and deploy your code automatically.
Collaboration and Social Coding: GitHub fosters a social coding environment where developers can follow each other, star repositories, contribute to open source projects, and engage in discussions.
Workflow:
Clone: To start working on a project, you clone the repository from GitHub to your local machine using
git clone.Branch: You create a branch (
git branch) to work on a new feature or bug fix.Commit: As you make changes, you commit them (
git commit) with descriptive messages explaining the changes.Push: When your changes are ready to be shared, you push them to the remote repository (
git push).Pull Request: If you're collaborating, you create a pull request on GitHub, explaining your changes. Others review, comment, and potentially approve the changes.
Merge: Once the changes are approved, the pull request is merged into the main branch.
Fetch and Pull: Others can fetch (
git fetch) or pull (git pull) your changes to their local repositories to stay up to date.
GitHub provides a set of additional commands and interactions beyond basic Git commands. These commands are used within a Git repository hosted on GitHub. Here's a detailed explanation of some GitHub commands with examples:
🐧git clone <repository_url>:
Description: Copies a remote GitHub repository to your local machine.
Example:

🐧git pull origin <branch_name>:
Description: Fetches changes from a remote repository and merges them into your current branch.
Example:

🐧git push origin <branch_name>:
Description: Pushes your local branch's commits to the remote repository.
Example:

🐧git fork:
The git fork command is not a standard Git command. Instead, it's a GitHub-specific action that you perform on the GitHub platform itself. "Forking" refers to creating a copy of someone else's GitHub repository under your own GitHub account. This allows you to freely experiment with and make changes to the repository without affecting the original project.
Here's how you would fork a GitHub repository:
Go to the Repository: Visit the GitHub repository you want to fork using a web browser.
Click "Fork": In the upper right corner of the repository page, you'll see a "Fork" button. Click this button.
Choose Destination: GitHub will ask you where you want to fork the repository. Select your GitHub account (or an organization you're part of).
Forking: GitHub will create a new copy of the repository under your account/organization. You will be redirected to the new forked repository.
Once you've forked a repository, you'll have your own copy of the codebase, and you can make changes to it without affecting the original repository. You can also create branches, make commits, and even open pull requests in your forked repository.
📍Git Conflict:
A Git conflict occurs when there are conflicting changes made to the same part of a file by different branches or contributors. Git is designed to manage concurrent changes, but sometimes, when merging or rebasing branches, conflicting changes can't be automatically resolved, and you need to manually resolve them. Here's how you typically deal with Git conflicts:
Identify the Conflict: When you attempt to merge or rebase branches, Git will notify you if conflicts exist. It will point out the files with conflicts and mark the conflicting sections.
Open the Conflicted File: Use a text editor or an integrated development environment (IDE) to open the conflicted file. Git will insert conflict markers to indicate the conflicting sections.
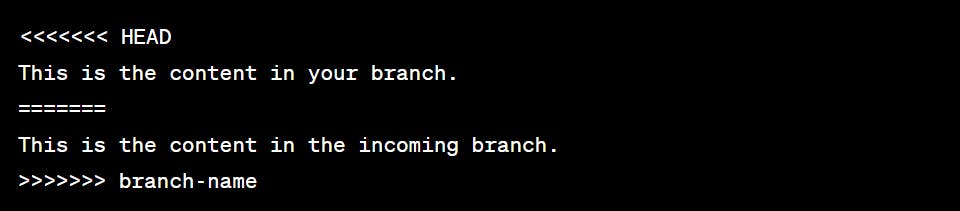
In this example, the content between
<<<<<<< HEADand=======is from your branch, and the content between=======and>>>>>>> branch-nameis from the incoming branch.Resolve the Conflict: Manually edit the conflicted file to remove the conflict markers and decide which changes to keep. You might want to:
Keep one set of changes and discard the other.
Combine changes from both sides.
Rewrite the content entirely.
Save the File: After resolving the conflict, save the file.
Stage the File: Use
git addto stage the resolved file.Commit the Resolution: Complete the merge or rebase by creating a new commit that marks the conflict as resolved.

Continue Merging or Rebasing: If you were in the process of merging or rebasing, complete the process using
git merge --continueorgit rebase --continue.Push or Finalize: If you're merging and resolving conflicts in your local branch, push the changes to the remote repository. If you were rebasing, remember that rewriting history can have implications for collaborators.
Conflicts are a natural part of collaborative development. Proper communication and understanding of the changes being made can help prevent conflicts. When conflicts do occur, careful manual resolution is crucial to ensure the final codebase remains consistent and functional.
📍conclusion
Git and GitHub have revolutionized the way software is developed, fostering collaboration, transparency, and efficiency. Git's distributed nature empowers developers to work both online and offline, while GitHub enhances collaboration by providing tools for code review, issue tracking, and team coordination. The rise of Git and platforms like GitHub has led to a new era of open-source development, where developers from around the world can contribute to projects seamlessly. This ecosystem has not only accelerated software development but has also democratized access to quality software and fostered a global community of developers. Embracing Git and GitHub is not just a technical choice; it's a cultural shift that emphasizes collaboration, iteration, and innovation in the world of software development.